My world of baking insecurity started over ten years ago when I tried and failed several times to bake the River Cafe Chocolate Nemesis and joined the legions of people defeated by what was reputed as one of the trickiest bakes for home cooks.  As I now think of how that chocolate tort defeated me I momentarily feel all determined to want to rise to the challenge again.  But who needs challenging cakes when you can make life easy for yourself.
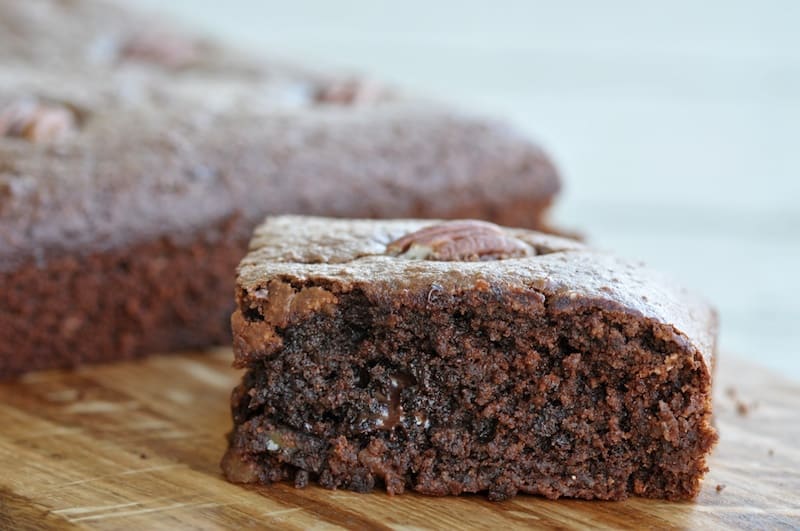
I’ve always been a bit ambivalent about brownies on account of their fickle personalities. Some days they will be gooey and succulent and others dry and crumbling. Life is too short to worry how a cake might behave on any given day so I’m delighted to have found a quick, easy and reliably gooey yet crumbly cake that has become a regular lunch box treat.  No need to worry about the gluten, carb and sugar load so that makes it all the more satisfying in this house.
I’m blogging this Anti Chocolate Nemesis Brownie for those moments when only chocolate cake will do and as part of Sweet New Zealand a monthly blogging bake-off created by Alessandra Zecchini and this month hosted by the lovely Lesley at Eat, etc.


The Anti Chocolate Nemesis Brownie
Adapted from The Joy of Gluten-Free, Sugar Free Baking by Peter Reinhart and Denene Wallace
3 cups Almond Flour (ground almonds)
0.5 cups cocoa powder (unsweetened or raw)
0.5 cup chocolate chips (over 75% cocoa)
2 cups sweetener (I used 1 cup Splenda and 1 cup coconut sugar but you could use the equivalent caster sugar)
1 cup roughly chopped  toasted nuts (I used pecans)
2 tsp Baking Powder
3 eggs
0.5 cup milk
1 tblsp vanilla essence
0.25 cup (approx 50g) melted unsalted butter
9/12 toasted nuts (I used pecans) to decorate.
1. Pre-heat oven to 170 Degrees C (fan oven – 180 degrees if no fan) and line the bottom of an 8 inch square baking tin with baking paper.
2. Mix together almond flour, cocoa, sweetener, Â baking powder, nuts and chocolate chips in a large bowl until well blended.
3. In a separate bowl, whisk together the milk, eggs, vanilla essence and melted butter. Add in the dry mix and using a wooden spoon stir for a couple of minutes until you get a thick sticky dough.
4. Â Pour the mix into your prepared tin. If you want to pretty up your brownie, decorate with your favourite nut.
5. Bake for 15 minutes, then rotate the tray and bake for another 10 until slightly springy but still squigy to touch. Â If you like your brownies a little drier bake for another 5 minutes until when tested with a toothpick it comes out clean. Remove from the oven and leave to cool for at least 15 minutes before transferring to a cutting board if you can’t wait to eat or to a cooling rack if you have the patience of a saint.
6. Â Cut the Brownie into 3×4 or 3×3 grid to give you 9 or 12 brownies depending on how greedy or saintly you are.

Yes sometimes only chocolate will do, and what a great entry for Sweet New Zealand!
Ciao
Alessandra
Been a while Allessandra but pleased to be back with Sweet NZ.
Oh yes please…they look perfectly chocolatey & fudgey. Hope you are having a happy chocolate & hot cross bun filled Easter 🙂
I can’t wait to try these, Julie. I must admit I’ve never tried making River Cafe’s Chocolate Nemesis Cake, but it’s been on my list for ages. However, as you say life is too short for challenging cakes, especially when you’re like me and slightly challenged in the baking department at the best of time, so the thought of “reliably gooey” is like a siren-call to me. I’m just a little bit scared about how good these might be – I’m thinking they could be seriously addictive.
I fear the worst for you Sue – most definitely moreish :o)
These do look oh so gooey and divine. I have been trying to make a low sugar brownie for some time that isn’t dry. I have had some luck with adding cooked beetroot to up the moistness and adding dates too but it still don’t look like this. Have you tried using Stevia as a sweetener or zylitol? They are two natural sugar substitutes I use in my cooking at times. Happy cooking Julie 🙂
Hi Nicola, hope that this might work for you. I’ve tried stevia but don’t like the taste of the concentrate and xylitol was unpredictable in baking, hence ended on settling for Splenda which seems to give the best texture. JT
That’s a neat video of Sian making the Nemesis. But have you noticed how they try and pull a fast one at the end? The Nemesis that she cuts into is not the one shown being made, it’s noticeably larger. That’s because the restaurant Nemesis is a 30cm beast, whereas the Easy Nemesis being demonstrated is smaller (23-25cm). No harm done… just a little sneaky.
I think that this rest my case about the nemesis – no good ever comes of it :o)